
I grow a lot of veg, herbs and fruit in planters at home, to make a largish area of old concrete productive. In November Vegepod sent me* one of their large pods to try out. Here’s how I filled it with different composts to help create a richly diverse environment for the soil life that will enable the plants to thrive.
This works for any large container (smallish ones too!)
 I’ve had a lot of questions about this container garden on social media when I’ve posted photos of it, so I’ll start with how I set up the vegepod.
It all came in this large package.
The first job was unpacking all of the different parts and finding the instructions. Then I made a cup of tea and watched all of the relevant tutorials on their website. That week the weather was awful, barely an hour a day without rain, so I was a bit jealous of the lovely location of the demos, beside a lake in the sunshine.
This is the gorgeous (?!) area of concrete which is being transformed into a productive paradise (I hope!) Honestly, the people who owned my house in the past really loved concrete…..hence my enthusiasm for growing in containers as well as the ground.
It’s awash with wet mud because quite frankly it had barely stopped raining in weeks and my garden was squelching so much even the concrete was covered in mud. To the left of the photo is one of my Hotbins, and a dalek composter to the right, in a fruit bed. I placed a couple of paving slabs beside the raised area of concrete to make it level for the container garden.

My vegepod is the large size, which comprises of two medium bases with a large cover . First job: make the frames which support the whole structure.


For the next two days I managed just a short time outside thanks to horrible weather, which was enough to make the stand. Unfortunately due to the heavens opening I appear to have forgotten to photograph the frame, but you can see it on the box.
The next day was happily mostly dry all day, so I was able to make the whole container garden. This required space for setting everything out, and I must admit I was somewhat daunted by the size, but I did it!
I slotted the four containers into the frame, put in the base panels and then built up the sides using the side panels and clips. I’m not sure how easy it is to tell from the photos, but it’s rather huge. One could quite possibly camp in it.


Then it was time to make the cover. This is very tricky on one’s own and I do advise getting someone to help if you can: Vegepod recommend two people, too. I didn’t have anyone to hand and succeeded – eventually – hurrah! But this part was rather stressful because the cover is large, which is fantastic from a growing point of view but not so much when you’re trying to manoeuvre it at only 5′ 6″ in a breeze…..
 The pod came with two covers, a mesh one (rather like the Thermacrop I sometimes use in the garden, a looser knit enviromesh/fleece) and a clear plastic winter cover. I decided to put both on for extra warmth. Everything is fastened securely with ties. I found it tricky trying to get the tie through the mesh cover as instructed, so went and had a cup of tea and a ponder, then found the solution – a crochet hook! So here is my top tip for getting cords through small mesh holes, an appropriately sized crochet hook.
Next, I fastened the internal irrigation system to the top – my garden hose clips onto this and a sprinkler system waters the compost.
The cover fastens to the base with some strong clips. It now resembled a baby polytunnel on legs. Time to fill it.


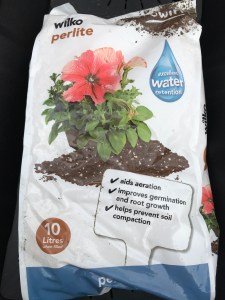 The manufacturers recommend filling the base (underneath the bottom panels that you can see in the photo) with vermiculite and perlite. Unfortunately I didn’t have much and the local shop had none, so I did the best that I could with the resources to hand, mixing together what I had in the greenhouse, and fortunately that just about did the job.
Next I gathered together the different composts. I had:
– Dalefoot double strength wool compost, some pre-soaked. This is as the name suggests double strength and ideal to mix with pre-used composts or something less nutrient rich like…
– fluffy coir (which had come as bricks, I soaked them overnight in water because it can take 12 hours or so for it to be useable, I find). This isn’t super-nutrient rich really but adds bulk.
– homemade compost from the compost heap.
– pre-used compost I’d saved from last summer’s pots. This is one big container and uses a lot of compost!
Any bought compost of your choice is fine. Dalefoot is not veganic, so if you prefer to avoid animal products use one of the vegan composts, or whatever you can get. You don’t need coir – I used it because I had some left from another trial I was doing.
The homemade and pre-used compost adds something very special to the mix – soil biology. Not just worms, but microbes, fungi and other soil life – it helps to create a biodiverse soil life in this large container, which will benefit the plants that I grow. As the plant roots go down, the soil life will respond and my baby polytunnel will become a happy balanced ecosystem.


This also saves money because it would cost rather a lot to fill this with bought compost. Of course this is a one-off large compost purchase, from now on I’ll add a surface mulch of compost as I do for my garden beds.
If you don’t have any homemade compost, some well rotted animal manure would do the trick, or a few handfuls of good garden soil (that might add some weed seeds too but they’ll be easy to weed out).
Although potting compost is perfectly nutrient rich and balanced, when filling any garden container my top tip is to think of the soil biology. Imagine that container is a little world for your plants to grow in, how happy it will be growing with fungi and other soil life to socialise with!
So, I mixed the different ingredients together and filled theVegepod, patting it all down every now and then to make sure that the compost will be firm for the plants. It needs to be filled right up to the top of the side panels. A final rake and then it was ready for planting. (Not the best photo of me, I haven’t quite got the hang of the bluetooth remote control!)
Planting time. All of these transplants should have been in the ground weeks ago, the poor things have been hanging on in the module trays!
I planted lettuce, kale, mustards, 3 Florence fennel, spring onions, elephant and regular garlic cloves and sowed peas, broadbeans and radish. The peas and broadbeans are for shoots rather than pods, and their root systems will help the soil in there come alive ready for spring sowings.


The planter is at waist height which is a different experience for me. It is rather lovely not bending, especially in this damp weather which sets off my osteoarthritis (I’ve had this for years, please no medical advice in the comments as all is under control).
I’m thinking about how to use the space underneath for growing and also harvesting rainwater…..

picking salad
Seven weeks later, last week, I had my first harvest and this is the garden today – some photos a bit gloomy because the day has been incredibly dark and gloomy.
My main concern was the lid flying away in the wind, the base is full of compost and really heavy, so that’s not going anywhere. I have some cotton rope tied gently across the structure just in case the lid blew out of the clips. However so far storms have flattened much of my garden but the lid hasn’t moved at all.


Of course it is plastic which is a downside, but as far as I can tell this is strong durable plastic rather than the sort that ends up in landfill after a season.
I’ve no idea how it will grow over the year, so I’m looking forward to finding out. I have bought it a soil thermometer and air thermometer, to make comparisons with the polytunnel. It is interesting having a different growing environment to play with.
+++++++++++++++++++++++++++++++++++++++++++++++++++++++++++++++++
* Vegepod has kindly gifted me this container garden to try out. I’m under no obligation to say nice things about it and have not been paid any money for this blog.
I’m often asked to try things out, and always mention in the blog and on social media when something has been gifted – like the Dalefoot compost I am trialling and have mentioned in previous posts – rather than bought myself.
The bamboo hand rake is from Niwaki, also gifted.


These look amazing! Seems great for balconies as well if you have an apartment!
I’d be interested to know. One would need the space inside the apartment to set the thing up, push the sofas back for the duration, but I think once set up it should be substantial: if the storm damage to the rest of my garden is anything to go by, it is solid.
Thanks, Steph for writing this at just the right time!
Only yesterday I suggested a raised manger-type pod to a friend and her daughter who really want to grow veg, but so far have tried and failed in their small garden on heavy clay and with 3 greyhounds leaping around. And now here’s your blog!
They decided straight away that this sort of thing was just what they needed – especially with the added advantage of working at waist height (my friend has osteoarthritis too).
Your blog is wending its way to her as we speak!
Ain’t synchronicity great!!
Hey, that is good timing! Glad it has been helpful 🙂
Thanks for posting..i just bought the large and medium vegepods .. Im really looking forward to growing lots of food with them ..i liked the tip about having a air and soil temperature gauges. I will definitely be buying a couple for each !
I am currently packing up my vegepod for the house move and it is very easy to do so far. Looking forward to setting them up in my new home – I now have a medium one too, as well as the large.
Dear Stephanie,
I don’t know if you are still happy with your vegepod, I am considering a small vegepod on a stand without wheels. Are you able to give me some planting up ideas it’s 50 cm x 1meter.
I would love to use it for most of the year growing a spring, summer and autumn selection. But not just leaves! !!
I am in the UK so I have been checking out the UK vegepod website. I am deaf so I really need some sort of book I think as I can’t get the subtitles to work on this mobile! !!
Looking forward to your reply, God bless.
Vicky
Hi Vicky
I still have the vegepod, but sadly the cover was destroyed recently in a storm and so it’s looking rather battered just now. It would make sense for Vegepod to have some planting schemes and other info written on their website.
It’s good having something where you can garden standing up, and I found it very handy in my previous garden where it was situated on concrete and so made that area productive. They are expensive however, and require a lot of compost initially, so that needs to be factored in.
I am sorry that I can’t provide planting schemes for the vegepod – I have a lot of work on just now. I mostly use mine now for growing salads. You can grow most things in there that do not require insect pollination (if you’re using the lids) remembering to situate taller plants in the middle.
Without the cover I have grown potatoes and even sweetcorn in there, because the containers are quite deep.
Good luck with whatever you decide works best for you.
Hi Stephanie
I’ve recently bought a Vegpod and filled it with own mix. I read that Vegepod recommend turning the soil after a season before adding other nutrients. What are your thoughts on this having been using one for a while?
There’s no need to turn the soil, I just add a little extra compost to the surface annually.
Thanks Stephanie, those were my thoughts too as, being a no dig gardener I’m reluctant to disturb the soil even though the Vegepod is a container garden rather than a garden bed.